Thứ Tư, 27 tháng 4, 2016
[TUTORIAL] Java Flat Design Basic
เทคนิคแนวคิดเบื้องต้นสำหรับการออกแบบ หน้าตา GUI สำหรับ java Programming
Thứ Tư, 20 tháng 4, 2016
Please welcome our friend Uri Goldshtein of the Meteor team as a guest author as he walks us through using Angular 2 with Meteor and describes some exciting future capabilities. -- Brad Green, Eng Director of Angular
Angular 2 + Meteor: the Javascript stack of the future
Intro
Meteor is the easiest way for an Angular developer to become a full stack developer, extend Angular apps to become full stack web and mobile apps and leverage your existing knowledge.Last week, after months of development, Meteor released a huge milestone - Meteor 1.3. Together with the amazing progress of Angular 2.0 we reached a very exciting point where both platforms are now naturally integrated and it’s easier than ever to create a full stack app with Angular and Meteor. In this post I will bring you up to speed with recent updates and why Angular Meteor is now a better stack for Angular developers then it has ever been.
Meteor 1.3: Integrated with the wider ecosystem
Meteor is a full stack JavaScript Platform that takes care of everything you need to build web and mobile apps: Database, server, communication, client side and mobile support. It supports full stack reactivity out of the box so that any change in the DB can propagate all the way to the clients UI in real time. It is completely open source and it’s the easiest and fastest way to create a full stack app from the ground up. It has been integrated with Angular for the past year and a half with the Angular Meteor library.The recently released Meteor 1.3 includes many features that makes Angular developers feel even more at home.
The version had two major goals:
- Align the Meteor platform with the latest innovations in the JavaScript ecosystem
- Based on production customers feedback, make Meteor better for building, scaling, and testing large scale production apps
Here are the main new features that made those two goals possible:
npm integration
With Meteor 1.3, you can use npm directly to integrate the whole Javascript ecosystem into your apps. It means that to include `angular`, `angular2` or any other library like `ui-router` or `ionic`, you can just use `npm install` like you would with any other app:npm install angular angular-meteor ui-router --save
Native ES2015 modules support
Meteor is bringing the best of JavaScript to you in one package, so Meteor 1.3 natively supports ES2015 out of the box. In 1.3 that also means full support for ES2015 modules both on the client and the server:import {Component, NgZone} from 'angular2/core';
import {Parties} from '../collections/parties.ts';
...some lines skipped... @Component({
...some lines skipped... templateUrl: 'client/app.html'
})
export class PartiesList {
parties: Mongo.Cursor;
constructor () {
this.parties = Parties.find();
}
}
Built-in application testing
With Meteor 1.3, you have build-in support for both unit and integration tests with your favorite testing tools like Mocha and Jasmine. We’ve also updated all tutorials to include unit and integration tests:import 'angular-mocks';
import { Meteor } from 'meteor/meteor';
import { assert } from 'meteor/practicalmeteor:chai';
import { sinon } from 'meteor/practicalmeteor:sinon';
import todosList from '../todosList';
...some lines skipped...
describe('controller', function() {
describe('addTask', function() {
var controller;
var newTask = 'Be more fabolous';
beforeEach(() => {
sinon.stub(Meteor, 'call');
controller = element.controller('todosList');
controller.newTask = 'Be fabolous';
controller.addTask(newTask);
});
afterEach(() => {
Meteor.call.restore();
});
});
});
})
Cordova improvements
Meteor’s hot code push module has been completely re-written in native code to make it more robust and to save bandwidth and battery life. Also, the new integration now supports WKWebView out of the box. If you are writing an Ionic based app, those improvements will be a huge for youLivedata improvements for scale
Meteor’s real-time database layer has improved to give more flexibility to operate more efficiently in high loads.Meteor guide
An official guide from the Meteor team with best practices for writing large Meteor apps. Many of the code samples are written using Blaze, Meteor’s default templating system, but all of the principles can be applied to Angular apps as well.This means that Meteor is now not just the fastest and easiest way to create full stack apps, but also lets you smoothly scale up your codebase as your team and user base grow.
Angular 2.0 and 1.5
Angular 2.0 is a revolution compared to Angular 1.x in terms of handling data. The way Angular 2.0 handles data gives us the opportunity to write a very simple data syncing layer for Meteor. Now you can use Meteor’s native APIs like any other Meteor application and Angular 2.0 code like you would with any other Angular app.That means that as an Angular Meteor developer you can use solutions and knowledge from all the Meteor community, no matter what front end framework they use.
Angular 2.0 Meteor:
import {Component, NgZone} from 'angular2/core';
import {Parties} from '../api/parties.ts';
...some lines skipped...@Component({
...some lines skipped...
templateUrl: 'components/partiesList/partiesList.html'
})
class PartiesList {
parties: Mongo.Cursor;
constructor () {
this.parties = Parties.find();
}
}
Inspired by the changes in Angular 2.0, we also refactored our Angular 1.x data solution to give you the ability to write your app using native Meteor APIs.
Angular 1.x Meteor:
class PartiesList {
constructor() {
...some lines skipped... this.helpers({
parties() {
return Parties.find();
}
});
}
}
Best practices
Meteor 1.3 together with the new features in Angular 1.5 (Component, One way bindings, etc..) makes it very easy to follow Angular’s best practices from the new Upgrading from 1.x article on angular.io. That is thanks to the out of the box ES2015 modules support and the new Meteor Typescript package.So we re-wrote all of our Angular 1.x tutorials to fit with Angular’s best practices including splitting everything into components, modules, testing, using Javascript ES2015 and using Typescript on the client and server.
import angular from 'angular';
import angularMeteor from 'angular-meteor';
import {Parties} from '../api/parties.ts';
...some lines skipped...
class PartiesList {
constructor() {
...some lines skipped... this.helpers({
parties() {
return Parties.find();
}
});
}
}
export default angular.module('partiesList', [
angularMeteor,
]).component('partiesList', {
templateUrl: `components/partiesList/partiesList.html`,
controllerAs: 'partiesList',
controller: PartiesList
});
Future proof stack
Moving to Angular Meteor gives you not only a great stack now, but also makes it easy to stay updated with the latest features that JavaScript has to offer.Today, Meteor is the community leader in terms of moving data across the stack, and we are already working on the next generation of data integration based on GraphQL. Any app and stack will be able to use Apollo, giving Angular developers a step into the best and latest things GraphQL has to offer. With future releases of Meteor, you will get the best platform for GraphQL based apps, with a clear and easy update plan from today’s technology.
When you pair that with the Angular 2.0 platform which pushes the limits of front end technology with support of multiple renderers, web workers, animations, server-side rendering, internationalization and endless features, you know your stack is covered to support the latest things that the web can do, both on browser and mobile.
Community
The Angular Meteor community has grown a lot in the past 2 years. Angular-Meteor developers have pushed both technologies forward, sharing knowledge, standards, tools and best practices between Angular and Meteor, having a huge impact on those technologies and the whole Javascript community.Join the growing Angular-Meteor community today and try out Meteor’s and Angular’s latest features - click here for the first tutorial on meteor.com and here for the advanced tutorial on angular-meteor.com
Thứ Ba, 19 tháng 4, 2016
Angular 2 + React Native
Please welcome Marc Laval joining our blog as a guest author. Marc works at Amadeus in France as part of a group of developers there dedicated to contributing to Angular 1 and 2 core development as an integrated part of our team. We've been working closely with him on the React Native integration. Read on to learn how you can get going with it. -- Brad Green, Eng Director of Angular
The Angular 2 and React Native story started last summer, when Scott Little developed a promising proof of concept with both technologies during an internship on the Angular team.
Starting from this, we pushed the idea forward and are now pleased to share a library to build your own React Native applications with Angular 2 for iOS and Android:
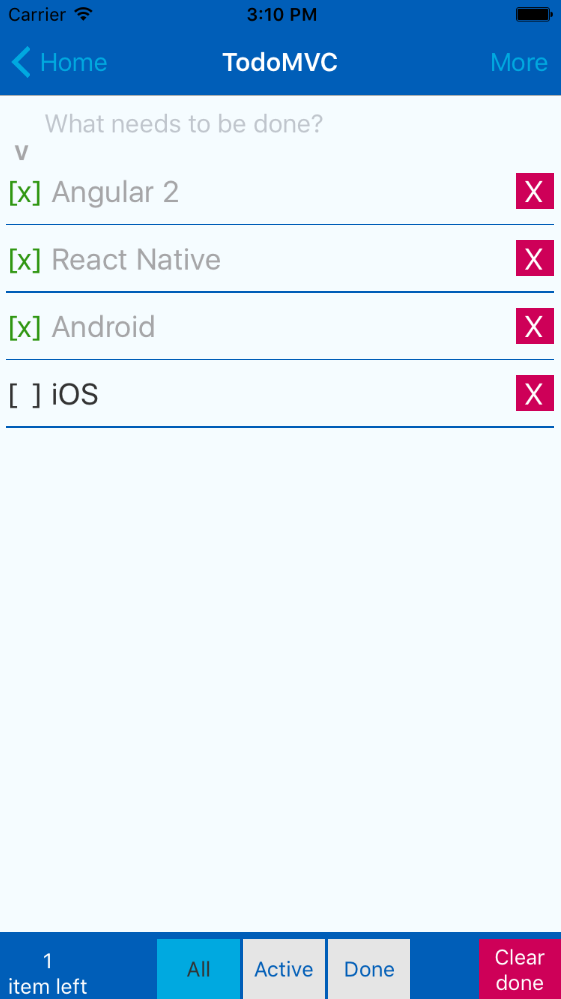
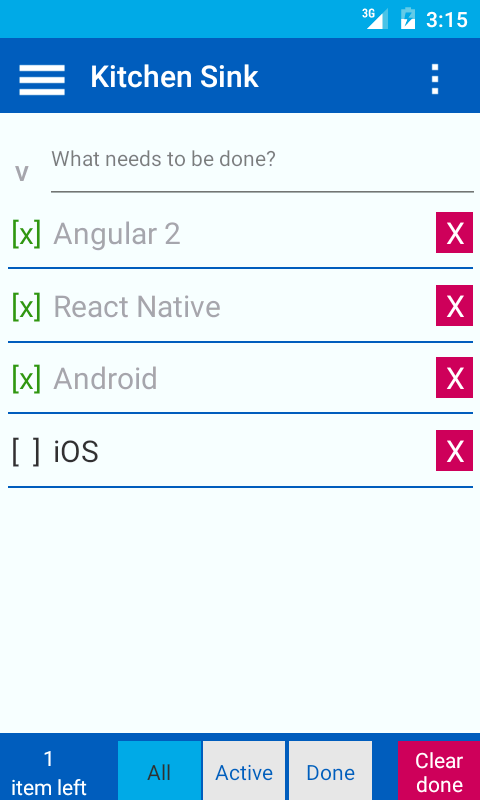
The TodoMVC of the Kitchen Sink demo application in iOS (left) and Android (right)
It’s all about cross-platform apps
The strategy of Angular 2 is to provide a single platform that developers can use to target all channels and devices:
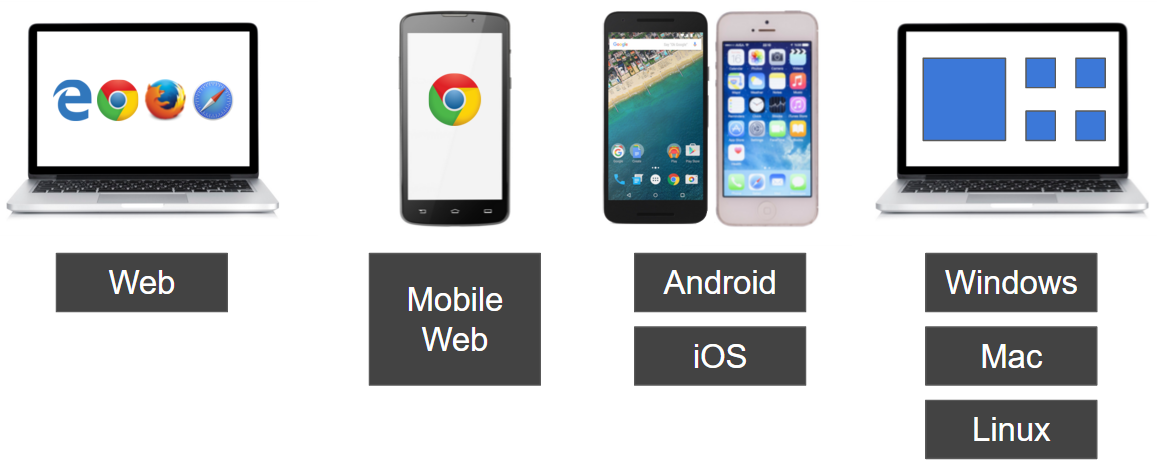
With a similar intent, React Native was created by the React team to provide a unified developer experience for web and mobile application development, with JS and React. Here, applications render native UI as they directly use actual UI components - i.e. there is no Cordova or WebView involved.
Integrating Angular 2 and React Native together is a great solution for the mobile application channel!
A React Native renderer for Angular 2
That’s exactly what the library really is - a renderer which glues Angular 2 and React Native together (see the technical details below). With it, developers can create applications where the best of both world can be used in terms of features and tools.
They key is that, in such applications, the Angular 2 part is just standard, with the usual directives, modules, dependency injection, change detection, etc.
So all the skills and code can be shared to do cross-platform development!
Well, to be honest, they are almost standard, because there is no such thing as HTML or CSS in a native application. Instead, in their templates, developers will take advantage of the provided ambient components as basic bricks to build applications:
- Image, Picker, RefreshControl, ScrollView, Switch, Text, TextInput, View, WebView - that are common to both Android and iOS
- Android specific: DrawerLayout, PagerLayout, ProgressBar, Toolbar
- iOS specific: ActivityIndicator, DatePicker, MapView, Navigator, ProgressView, SegmentedControl, Slider, TabBar
Moreover, to guarantee a great developer experience, the library ensures that all Angular 2 features are usable, including the router and http modules.
It also provides advanced gestures recognition based on Hammer.js. Reacting to a tap, a swipe or a pinch in an application is as easy as reacting to a click in a website.
Finally, it also integrates the APIs of React Native, making sure they all work seamlessly with zone.js, e.g. network, geolocation, async storage, clipboard, etc.
Try it today!
To start a new project quickly, you should have a look at the angular2-react-native-seed project on Github and read the documentation.
From the react-native-renderer itself, you can also build and play with demo applications for both Android and iOS. They showcase all components and features available.
How does it work?
Here is the full picture where the blue parts are from React Native, and the red ones from Angular 2:
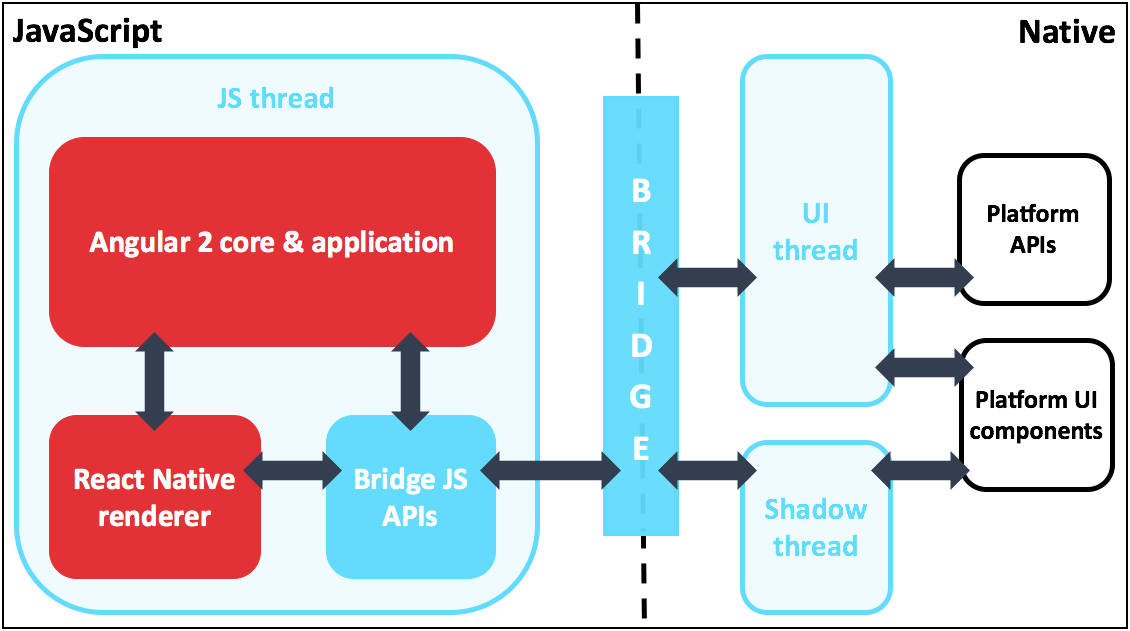
Architecture of a React Native application with Angular 2
Technically, a React Native application runs 3 threads. The main one is a JS thread where any JS code can be executed; it controls the full application. The other two run the native part of the application: the standard main UI thread, and a “shadow” thread where measuring and layout occur.
The native and JS sides communicate in both directions through a bridge. This means that there are Bridge JS APIs to access native features (network, geolocation, clipboard, etc) and manipulate native elements, and that native events are sent back to the JS side.
Angular 2 fully decouples the rendering from the core of the application where live all the components, directives, dependency injection, change detection, etc. By default it renders to DOM, but makes it possible to create custom renderers. This is explained in depth in Rendering in Angular 2 by Matias Niemelä.
So, let’s take a step back and put all pieces together:
a React Native application…
...in which an Angular 2 application runs in the JS thread…
...with a custom renderer that uses the JS APIs to create a native UI.
That’s it!
What’s next?
We have just entered the alpha phase which is necessary to get first feedbacks, fix bugs and implement more features.
Then, as next steps, we will look at:
- Animations: Angular 2 will have a brand new animation module. At the same time, the React Native team is working hard to push animations on the native side to get more performance. These two need to work together to bring awesome animations.
- Extensibility: React Native provides a subset of the features and components that exist in the Native world. It can be extended and there is already an active community publishing packages. This has to be made available in the Angular 2 context as well.
- And performance: it is great today but we want to make it lightning-fast.
Thứ Ba, 12 tháng 4, 2016
5 Rookie Mistakes to Avoid with Angular 2
So you've read some blog posts, watched some conference videos, and finally you're ready to get your feet wet with Angular 2. What are some things you should know starting out?
Here's a compilation of common beginner mistakes to avoid when you're writing your first application.
Note: This blog post assumes basic knowledge of Angular 2. If you're brand new to the framework, here are some good resources to get up to speed:
Here's a compilation of common beginner mistakes to avoid when you're writing your first application.
Note: This blog post assumes basic knowledge of Angular 2. If you're brand new to the framework, here are some good resources to get up to speed:
Mistake #1: Binding to the native "hidden" property
In Angular 1, if you wanted to toggle the visibility of an element, you would likely use one of Angular's built-in directives, like ng-show or ng-hide:
Angular 1 example
<div ng-show="showGreeting"> Hello, there! </div> |
In Angular 2, template syntax makes it possible to bind to any native property of an element. This is incredibly powerful and opens up a number of possibilities. One such possibility is to bind to the native hidden property, which, similar to ng-show, sets display to "none".
<div [hidden]="!showGreeting"> Hello, there! </div> |
At first glance, binding to the hidden property seems like the closest cousin to Angular 1's ng-show. However, there is one "!important" difference.
ng-show and ng-hide both manage visibility by toggling an "ng-hide" CSS class on the element, which simply sets the display property to "none" when applied. Crucially, Angular controls this style and postscripts it with "!important" to ensure it always overrides any other display styles set on that element.
On the other hand, the "display: none" styles attached to the native hidden property are implemented by the browser. Most browsers do so without an "!important" postscript. Consequently, the style carries low specificity and can be easy to override accidentally. It's as simple as adding any display style to the element you're trying to hide. In other words, if you set "display: flex" on the element in your stylesheet, it will outrank the style set by hidden and the element will always be visible (see example) .
For this reason, it's often better to toggle an element's presence using *ngIf.
Angular 2 *ngIf example (recommended)
<div *ngIf="showGreeting"> Hello, there! </div> |
Unlike the hidden property, Angular's *ngIf directive is not subject to style specificity constraints. It's always safe to use regardless of your stylesheet. However, it's worth noting that it's not functionally equivalent. Rather than toggling the display property, it works by adding and removing template elements from the DOM.
An alternative would be to set a global style in your application that configures "display: none !important" for all hidden attributes. You might ask why the framework doesn't handle this by default. The answer is that we can't assume this global style is the best choice for every application. Because it could potentially break apps that rely on the normal specificity of hidden, we leave it up to developers to decide what is right for their use case.
Mistake #2: Calling DOM APIs directly
There are very few circumstances where manipulating the DOM directly is necessary. Angular 2 provides a set of powerful, high-level APIs like queries that one can use instead. Leveraging these APIs confers a few distinct advantages:
- It's possible to unit test your application without touching the DOM, which removes complexity from your testing and helps your tests run faster.
- It decouples your code from the browser, allowing you to run your application in any rendering context, such as web workers or outside of the browser completely (for example, on the server or in Electron).
When you manipulate the DOM manually, you miss out on these advantages and ultimately end up writing less expressive code.
Coming from an Angular 1 paradigm (or no Angular background), there are a few situations where you may be tempted to work with the DOM directly. Let's review a few of these situations to demonstrate how to refactor them to use queries.
Scenario 1: You need a reference to an element in your component's template
Imagine you have a text input in your component's template and you want it to auto-focus when the component loads.
You may already know that @ViewChild/@ViewChildren queries can provide access to component instances nested within your component's template. But in this case, you need a reference to an HTML element that is not attached to a particular component instance. Your first thought may be to inject the component's ElementRef thusly:
Working with the ElementRef directly (not recommended)
@Component({ selector: 'my-comp', template: ` <input type="text" /> <div> Some other content </div> ` }) export class MyComp { constructor(el: ElementRef) { el.nativeElement.querySelector('input').focus(); } } |
However, this type of workaround isn't necessary.
Solution:
What developers often don't realize is that it's also possible to query by local variable in addition to component type. Since you control your component's view, you can add a local variable to the input tag (e.g. "ref-myInput" or "#myInput") and pass the variable name into the @ViewChild query as a string. Then, once the view is initialized, you can use the renderer to invoke the focus method on that input.
Working with ViewChild and local variable (recommended)
@Component({ selector: 'my-comp', template: ` <input #myInput type="text" /> <div> Some other content </div> ` }) export class MyComp implements AfterViewInit { @ViewChild('myInput') input: ElementRef; constructor(private renderer: Renderer) {} ngAfterViewInit() { this.renderer.invokeElementMethod(this.input.nativeElement, 'focus'); } } |
Scenario 2: You need a reference to an element a user projects into your component
What if you need a reference to an element that isn't in your component's template? As an example, let's imagine you have a list component that accepts custom list items through content projection, and you'd like to track the number of list items.
You can use a @ContentChildren query to search your component's "content" (i.e. the nodes projected into the component), but because the content is arbitrary, it's not possible to label the nodes with local variables yourself (as in the last example).
One option is to ask your users to label each of their list items with a pre-agreed-upon variable, like "#list-item". In that case, the approach resembles the last example:
ContentChildren and local variable (not recommended)
// user code <my-list> <li *ngFor="let item of items" #list-item> {{item}} </li> </my-list> // component code @Component({ selector: 'my-list', template: ` <ul> <ng-content></ng-content> </ul> ` }) export class MyList implements AfterContentInit { @ContentChildren('list-item') items: QueryList<ElementRef>; ngAfterContentInit() { // do something with list items } } |
However, this solution isn't ideal because it requires users to write some extra boilerplate. You may prefer an API with regular <li> tags and no attributes. How can we make this work?
Solution: ContentChildren + directive with li selector
One great solution is to take advantage of the selector in the @Directive decorator. You simply define a directive that selects for <li> elements, then use a @ContentChildren query to filter all <li> elements down to only those that are content children of the component.
ContentChildren and directive (recommended)
// user code <my-list> <li *ngFor="let item of items"> {{item}} </li> </my-list> @Directive({ selector: 'li' }) export class ListItem {} // component code @Component({ selector: 'my-list' }) export class MyList implements AfterContentInit { @ContentChildren(ListItem) items: QueryList<ListItem>; ngAfterContentInit() { // do something with list items } } |
Note: It seems like it might work to select for only <li> elements within <my-list> tags (e.g. "my-list li"), but it's important to note that parent-child selectors aren't yet supported. If you want to limit the results to children of your component, using queries to filter is the best way.
Mistake #3: Checking for query results in the constructor
Mistake #3: Checking for query results in the constructor
When first playing around with queries, it's easy to fall into this trap:
Logging query in constructor (broken)
@Component({...}) export class MyComp { @ViewChild(SomeDir) someDir: SomeDir; constructor() { console.log(this.someDir); // undefined } } |
When the console logs "undefined", you may assume the query isn't working or you constructed it incorrectly. In fact, you are just checking for the results too early in the component's lifecycle. It's key to remember that query results are not yet available when the constructor executes.
Luckily, Angular's new lifecycle hooks make it easy to puzzle out when you should check for each type of query.
- If you're conducting a view query, the results will become available after the view is initialized. Use the handy ngAfterViewInit lifecycle hook.
- If you're conducting a content query, the results become available after the content is initialized. Use the ngAfterContentInit lifecycle hook.
So we can fix our above code thusly:
Logging query in ngAfterViewInit hook (recommended)
@Component({...}) export class MyComp implements AfterViewInit { @ViewChild(SomeDir) someDir: SomeDir; ngAfterViewInit() { console.log(this.someDir); // SomeDir {...} } } |
Mistake #4: Using ngOnChanges to detect query list changes
In Angular 1, if you wanted to be notified when a value changed, you'd have to set a $scope.$watch and manually check for changes each digest cycle. In Angular 2, the ngOnChanges hook greatly simplifies this process. Once you define an ngOnChanges method in your component class, it will be called whenever the component's inputs change. This comes in very handy.
However, the ngOnChanges method executes only when the component's inputs change -- specifically, those items you have included in your inputs array or explicitly labeled with an @Input decorator. It will not be called when items are added or removed from @ViewChildren or @ContentChildren query lists.
If you want to be notified of changes in a query list, don't use ngOnChanges. Instead subscribe to the query list's built-in observable, its "changes" property. As long as you do so in the proper lifecycle hook, not the constructor, you will be notified whenever an item is added or removed.
For example, the code might look something like this:
Using 'changes' observable to subscribe to query list changes (recommended)
@Component({ selector: 'my-list' }) export class MyList implements AfterContentInit { @ContentChildren(ListItem) items: QueryList<ListItem>; ngAfterContentInit() { this.items.changes.subscribe(() => { // will be called every time an item is added/removed }); } } |
If you're new to observables, you can learn more about them here.
Mistake #5: Constructing ngFor incorrectly
In Angular 2, we introduce the concept of "structural directives" that add or remove elements from the DOM based upon expressions. Unlike other directives, structural directives must be used with a template element, a template attribute, or an asterisk. Given this new syntax, it tends to be a target for beginner mistakes.
Can you spot the common errors below?
Incorrect ngFor code
// a: <div *ngFor="#item in items"> <p> {{ item }} </p> </div> // b: <template *ngFor let-item [ngForOf]="items"> <p> {{ item }} </p> </template> // c: <div *ngFor="let item of items; trackBy=myTrackBy; let i=index"> <p>{{i}}: {{item}} </p> </div> |
Let's correct the above errors, one-by-one.
5a: Using outdated syntax
// incorrect <div *ngFor="#item in items"> <p> {{ item }} </p> </div> |
There are actually two errors here. The first is a common trap that developers can fall into if they have Angular 1 experience. In Angular 1, the equivalent repeater would read ng-repeat="item in items".
Angular 2 switches from "in" to "of" in order to resemble the ES6 for-of loop. It may help to remember that ngFor's actual de-sugared input property is ngForOf, not ngForIn.
The second error is the "#". In older versions of Angular 2, the "#" used to create a local template variable within the ngFor, but as of beta.17, ngFor uses the "let" prefix instead.
A good rule of thumb is to use the "let" prefix if you want to make a variable available within ngFor's template, and to use the "#" or "ref" prefix if you want to get a reference to a particular element outside of an ngFor (like #myInput in Mistake 2).
// correct <div *ngFor="let item of items"> <p> {{ item }} </p> </div> |
5b: Mixing sugared and de-sugared template syntax
// incorrect <template *ngFor let-item [ngForOf]="items"> <p> {{ item }} </p> </template> |
It's unnecessary to include both a template tag and an asterisk - and in fact, using both won't work. Once you prefix a directive with an asterisk, Angular treats it as a template attribute, rather than a normal directive. Specifically, the parser takes the string value of ngFor, prefixes it with the directive name, and then parses it as a template attribute. In other words, something like
<div *ngFor="let item of items">
is treated just like
<div template="ngFor let item of items">
Functionally then, when you use both, it's like writing:
<template template="ngFor" let-item [ngForOf]="items">
Consequently, when the template attribute is parsed, all the value contains is "ngFor". Without a source collection or a local variable for "item" in that string, it cannot be processed correctly and nothing happens.
On the other side, the template tag no longer has an ngFor directive attached, so the code will throw an error. Without an ngFor directive, the ngForOf property binding has no component class to bind to.
The error can be remedied either by removing the asterisk, or converting completely to the short version of the syntax.
// correct <template ngFor let-item [ngForOf]="items"> <p> {{ item }} </p> </template> // correct <p *ngFor="let item of items"> {{ item }} </p> |
5c: Using the wrong operator in * syntax
// incorrect <div *ngFor="let item of items; trackBy=myTrackBy; let i=index"> <p>{{i}}: {{item}} </p> </div> |
To explain what's going wrong here, let's start by rewriting the code in long-form template syntax:
// correct <template ngFor let-item [ngForOf]="items" [ngForTrackBy]="myTrackBy" let-i="index"> <p> {{i}}: {{item}} </p> </template> |
In this form, it's easier to understand the structure of the directive. To break it down:
- We are passing two pieces of information into ngFor using input properties:
- Our source collection (items) is bound to the ngForOf property
- Our custom track-by function (myTrackBy) is bound to the ngForTrackBy property
- We are declaring two local template variables using the "let" prefix: "i" and "item". The ngFor directive sets these variables as it iterates over the items in the list.
- "i" is set to the zero-based index of the items list
- "item" is set to the current element in the list at index "i"
When we shorten the code to use asterisk syntax, we have to follow certain rules that the parser will understand:
- All configuration must happen within the string value of the *ngFor attribute
- We set local variables using an = operator
- We set input properties using a : operator
- We strip the directive name prefix from input properties ("ngForOf" → "of")
- We separate statements with semicolons
Following these rules, here is the result:
// correct <p *ngFor="let item; of:items; trackBy:myTrackBy; let i=index"> {{i}}: {{item}} </p> |
Semicolons and colons are actually optional because they are ignored by the parser. They're used mainly for readability. Thus, we can clean up our code to flow a bit more naturally:
// correct <p *ngFor="let item of items; trackBy:myTrackBy; let i=index"> {{i}}: {{item}} </p> |
Conclusion
I hope you found this explanation of common gotchas helpful. Happy coding!
Đăng ký:
Nhận xét (Atom)